
AI Agents
AI agents like Claude and Codex can work in Rayscaper for you. An agent is an AI assistant that uses Rayscaper by itself, from your instructions. Tell one what you want in your own words:
- “Turn my model into a dusk shot for the client.”
- “Make this look like a magazine shot.”
- “Light this room for the evening.”
The agent plants the garden, sets the sky, the lights and the materials, and frames the camera. Then it adjusts the brightness and the colors of your render. It looks at the render after every change, the way you would, and keeps going until the result is right.
Claude Code sets up a villa straight from SketchUp for a dusk render, from one prompt. Turn on the sound for the narration. Left: the conversation and every tool it calls. Top right: the render in Rayscaper. Bottom right: the model in SketchUp, with the preview of the plants it scatters, and the steps of the setup. Fast-forwarded: the whole run took eight minutes.
Agents reach Rayscaper through MCP (Model Context Protocol), the standard way for AI apps to use other programs. Rayscaper runs an MCP server while its render window is open, in SketchUp and in the standalone app. It works with any agent app that speaks MCP: Claude Code, Codex, Claude Desktop, Cursor, VS Code and others.
Set it up
Section titled “Set it up”You need an agent app, Rayscaper 0.9.99 or newer and a few minutes. The quickest way is to let the agent set itself up: copy this prompt into Claude Code, Codex or another agent app.
Set yourself up to use Rayscaper, the renderer for SketchUp, through its MCP server.
1. Register Rayscaper's MCP server for all my projects under the name "rayscaper". It's a Streamable HTTP server at http://127.0.0.1:47390/mcp, without authentication.   - Claude Code: run `claude mcp add --scope user --transport http rayscaper http://127.0.0.1:47390/mcp`   - Codex: add this to ~/.codex/config.toml and keep what's already there:     [mcp_servers.rayscaper]     url = "http://127.0.0.1:47390/mcp"   - Another app: add it the way that app adds a remote MCP server.2. Install the Rayscaper skill: download https://rayscaper.com/agents/rayscaper/SKILL.md and save it as rayscaper/SKILL.md in my personal skills folder (~/.claude/skills for Claude Code, ~/.codex/skills for Codex). If you have no skills, keep its advice in mind when you use the rayscaper tools.3. Tell me what you changed. The tools show up in a new session, while Rayscaper's render window is open.
The agent registers Rayscaper’s MCP server and installs the Rayscaper skill, which teaches it how to work with renders. Then:
-
Open the render window: in SketchUp click Start Render in the Rayscaper toolbar, or open a scene in the standalone app. The agent can only reach Rayscaper while the window is open.
-
Start a new session in your agent app, so it loads the Rayscaper tools.
-
Ask it something: “What’s in my Rayscaper scene?” A badge in the corner of the render shows that the agent is connected.
Setting it up by hand
Section titled “Setting it up by hand”Tools > Connect AI Agent… in the render window shows the settings for the most common apps, with a Copy button. They point to the address of your Rayscaper.
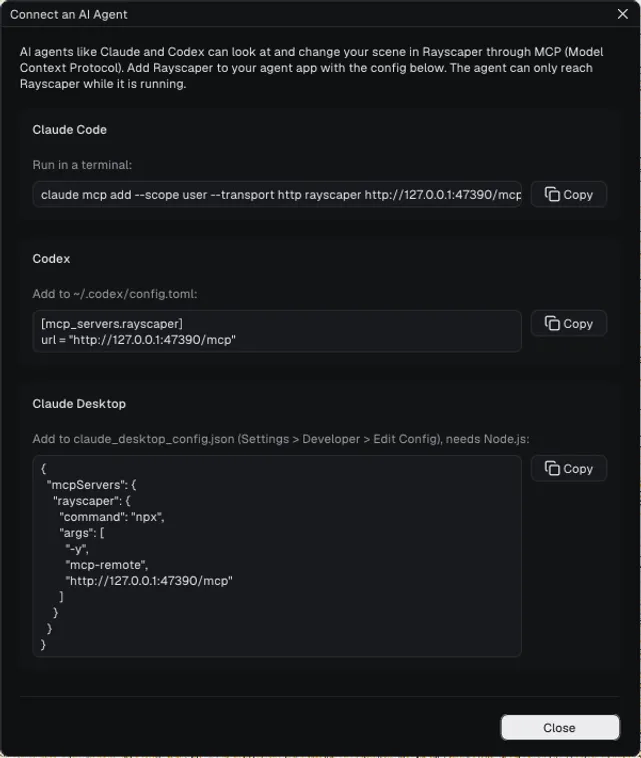
Run in a terminal:
claude mcp add --scope user --transport http rayscaper http://127.0.0.1:47390/mcp--scope user makes Rayscaper available in all your projects.
Add to ~/.codex/config.toml (%USERPROFILE%\.codex\config.toml on Windows):
[mcp_servers.rayscaper]url = "http://127.0.0.1:47390/mcp"This works for the Codex CLI, the Codex app and the Codex extension of VS Code.
Claude Desktop starts local MCP servers as a command, so it needs Node.js for the
mcp-remote bridge. Open Settings > Developer > Edit Config and add:
{ "mcpServers": { "rayscaper": { "command": "npx", "args": ["-y", "mcp-remote", "http://127.0.0.1:47390/mcp"] } }}Restart Claude Desktop afterwards.
Add a remote MCP server of type Streamable HTTP (sometimes only called HTTP) with the url
http://127.0.0.1:47390/mcp and no authentication.
The Rayscaper skill
Section titled “The Rayscaper skill”The skill tells the agent how to work in Rayscaper:
- Look at the scene and the render before it changes anything.
- Change one thing at a time and check the result.
- Keep the previous settings, so changes can be undone.
- Practical advice for light, exposure, cameras and materials.
The setup prompt installs it. To install it yourself, save SKILL.md as
rayscaper/SKILL.md in the skills folder of your agent app: ~/.claude/skills for Claude Code and ~/.codex/skills
for Codex. Other apps can use it as instructions.
Show the skill
---name: rayscaperdescription: Render, light and art-direct SketchUp models in Rayscaper through its MCP server (the rayscaper tools). Use when the user asks to change or judge a Rayscaper render, its materials, lights, sky, camera, scatters (grass, plants, trees) or look, to set up a model for rendering, to make render variations, or to set up the Rayscaper MCP server.---
# Rayscaper
Rayscaper is a path tracer for SketchUp, with a standalone app for other scene files. While its render window is openit runs an MCP server, and the `rayscaper` tools change the scene the user is looking at. The user watches the renderwindow while you work: a badge in its corner shows what you're doing, and they can stop your access there at any time.
## Connecting
The server is Streamable HTTP at `http://127.0.0.1:47390/mcp`, without a token. It only runs while Rayscaper's renderwindow is open (SketchUp: **Extensions > Rayscaper > Start Render**, or the standalone app). When that port was taken,Rayscaper uses the next free one: every running Rayscaper writes its url to `mcp/instances/<pid>.json` in its profile(`%APPDATA%\Rayscaper` on Windows, `~/Library/Application Support/Rayscaper` on a Mac, `~/.config/Rayscaper` onLinux).
If the `rayscaper` tools are missing, register the server once for all projects and start a new session:
- Claude Code: `claude mcp add --scope user --transport http rayscaper http://127.0.0.1:47390/mcp`- Codex: add to `~/.codex/config.toml`:  ```toml  [mcp_servers.rayscaper]  url = "http://127.0.0.1:47390/mcp"  ```- Other apps: add a remote (Streamable HTTP) MCP server with that url and no authentication. Apps that only start  local servers as a command use `npx -y mcp-remote http://127.0.0.1:47390/mcp`.
If the tools are there but every call fails, check these with the user:
- The render window is open.- Agent access is allowed: the user can stop it with the badge in the corner of the render, and allow it there again.- The url you use is the one that **Tools > Connect AI Agent...** in the render window shows. A second Rayscaper, for  example the standalone app next to SketchUp, uses another port.
## How to work
1. **Look before you change.** Call `get_scene` first: it lists the camera, environment, post processing, render   settings, materials and lights with their names. Call `get_selection` when the user says "this" or "the selected   ...". Then look at the render with `get_render_image` and `wait_for_samples: 32`. `render_control` starts, pauses   and resumes the render, and tells its state and samples.2. **Find things in space with `pick_point`.** It tells what is at a point of the image (x and y from 0 to 1, from the   top left): the material, the position in meters (Z is up), the normal and the bounds of the object. Use it to find   the table to hang a light above, the floor height or the wall to aim at.3. **Change one thing, then look again.** After a change call `get_render_image` with `wait_for_samples` (about 32   for a quick look, 128 or more to judge noise and fine detail) and judge the image yourself: exposure, contrast,   color, composition. Repeat until it looks right. Post processing doesn't restart the render, so its changes show at   once; the environment, materials, lights and camera restart it.4. **Keep the way back.** Every set tool returns the previous settings. Materials, the environment, scatters and post   processing can't be undone by the user, so remember the previous values and offer to put them back.   `set_material` with `restore` puts a material back as it was before your first change, image textures included.   Lights placed or moved in SketchUp and SketchUp camera moves are steps the user can undo in SketchUp.5. **Save what the user asked for** with `save_render` and an absolute path ending in `.png`, with   `wait_for_samples` (256 to 1024 for a final image). `.exr` needs a Rayscaper license. A wait returns after about   45 seconds, before agent apps give up on a tool call: when the result says `timed_out`, call again with the same   `wait_for_samples` until the samples are in.6. **Compare with the render history.** `render_history` with `save` keeps the live render (wait for a clean one   first), `list` lists the saved renders and `show` shows one in the render window and returns it as an image.   `set_post_processing` applies to a shown render too, to try another look without rendering again;   `apply_post_processing` restores the look a render had when it was saved. A wait for samples shows the live render   again. Use it to keep the versions you try, for example two skies or three lighting moods, and to show the user the   best.7. **Use the tools, not the UI.** Every change above has its own tool. `get_window_image` and `send_ui_input` show and   click the application's UI itself: use them only when the user asks for something in the UI. A wrong click can   open another scene and lose the user's work (the File menu of the standalone app loads a sample scene without   asking), and a menu you open stays open in front of the user. Close what you open with Escape.
## Setting up a whole scene
A model straight from SketchUp renders with a sky, AI denoising and SketchUp's materials, and a model saved withRayscaper has its own settings: read `get_scene` before you change them. To set it up, work from the big picture tothe details and look at the render after every step:
1. **Sky and exposure** (`set_environment`, `set_post_processing` with `denoise`): the light decides everything else.2. **Materials**: glass that is real glass, water that is water, and finishes from the asset library for the large   surfaces (`find_materials`).3. **Grass and scatters**: lawns that grow real grass, and plants and trees from the components of the model (see   Craft).4. **Lights**: lamps, fixtures and accents, mostly for evening and interior shots.5. **Camera**: the view, focal length and the resolution of the image.6. **Render settings and post processing**: samples for the final image, then the look (contrast, white balance,   vignette, bloom).7. **Final render** with `save_render`.
## Craft
- **Light:** the sky sets the mood. `set_environment` takes a sky preset (Clear, Hazy, Overcast, SoftLight,  GoldenHour, Sunset, BlueHour) and the sun's elevation and rotation; a low sun gives long shadows and warm light, but  nearby walls can block it, so check where it falls. For night, put the sun below the horizon or use a dark  environment, and light the scene with lamps. `find_hdris` finds HDRIs in the asset library for real-world light.- **Lamps:** turn a lamp shade into a light source by making its material emissive (warm white is about 2700 K), or  `place_light` a point, spot or area light inside or below it. Give a light a `preset` (for example `Bulb 60 W`,  `LED Downlight`, `Window`) to make it as bright as the real one instead of guessing an intensity, or set its  `brightness` in lumen (cd/m² for an area light without normalize, lux for a directional light); it keeps when the  temperature or a spot's cone changes. Real lamps need auto exposure at night. Spotlights take IES profiles for  realistic beams. Warm interior light against a cool blue-hour sky is a classic evening look.- **Changing lights:** `get_light` returns the settings of a light as `set_light` takes them, with its position and  direction. `set_light` changes, moves, turns or resizes a light; `remove_light` removes it and returns its  settings, so `place_light` can bring it back.- **Exposure:** adjust it with `set_post_processing` before adding lights. Interiors lit only through windows usually  need +1 to +2 EV. Avoid clipped windows and crushed shadows.- **Camera:** `set_camera` moves and aims the camera and sets the focal length (24 to 35 mm for interiors), the  resolution and depth of field. Keep verticals straight by keeping the camera level (target at the same height as  the position) for architecture. In SketchUp it moves SketchUp's camera, and fails while Lock Camera is on. While a  SketchUp section plane cuts the model, `get_scene` reports its `section_cut` under the camera, and  `section_cut_light` sets whether daylight comes in through the cut (`LetIn`) or the room keeps its shadows  (`KeepShadows`, for a cutaway of an interior).- **Materials:** `get_material` and `set_material` change a material by name; colors are linear RGB from 0 to 1, so  a mid grey is about 0.2, not 0.5. `find_materials` searches the asset library, and `set_material` with `asset`  replaces a material with one from there. A change is Rayscaper's own, the SketchUp material stays as it is.  Glass takes a `glass_preset` (`Clear`, `Window Pane`, `Lightly Frosted`, `Frosted`, `Crystal`, `Acrylic`, `Water`,  `Diamond`, `Anti-Reflective`) that sets its IOR, roughness and `thin` and keeps the color: `Window Pane` for a window  modelled as a single face, `Water` for water in a glass or a vase.  Curtains, lampshades and leaves that are lit from behind need `translucency` (0.4 to 0.7 for sheers, or the  `Sheer Fabric` finish), not a low opacity: translucency lets the light through softly, opacity makes a hole.- **Grass:** `set_material` with `type: Grass` turns the material of a lawn into grass that grows on every face  painted with it, in the render only. Start from a `grass_preset` (`Mowed Lawn`, `Garden Lawn`, `Meadow`,  `Dry Grass`, `Artificial Turf`). The lawns and the meadow keep the color, a medium to dark green, about  (0.06, 0.14, 0.035), looks natural; `Dry Grass` and `Artificial Turf` set a straw and a turf green. Then tune  `grass_height` (meters), `density` (relative to the preset), `mowing_stripes` (meters, 0 is off), `dryness`,  `patchiness`, `flattened`, `seed_heads`, `wind` and `wind_direction` (degrees, 0 is +X), `tip_color` and the others that `set_material` lists. `get_material`  reports what grew in `grass_grown`: clumps, blades and `capped`, which says an object holds too much grass and  grows it less densely. The grass grows again a second or two after a change, so render after it. A lawn of the Grass  material looks better than a scatter of grass components; Rayscapers before the Grass material don't list `Grass`  among the types of `set_material`, scatter grass there.- **Fur:** `set_material` with `type: Fur` grows real strands on every face painted with the material, in the  render only: shag and short pile rugs, sheepskin, faux fur throws, plush cushions, the coat of an animal. Start  from a `fur_preset` (`Shag Rug`, `Short Pile Rug`, `Sheepskin`, `Faux Fur`, `Plush`, `Animal Fur`, `Long Hair`);  they keep the color, except `Animal Fur` and `Long Hair`, which color the strands by `melanin` and  `melanin_redness`. Then tune `fur_length`  (meters), `fur_density` (strands per cm²), `strand_thickness` (mm), `curl`, `fur_direction`, `shine`, `clumping`,  `comb_random` and `comb_direction` and the others that `set_material` lists. Give it the color the rug has; Rayscaper  compensates for the light that bounces between the strands, a cream rug is about (0.55, 0.46, 0.33). An image texture in UV  mapping colors every strand by the texture at its root, so a patterned rug keeps its pattern. `get_material`  reports `fur_grown`: the strands and `capped`. Fur takes longer to render than a plain material; for velvet,  felt or a fabric seen from afar, the `sheen` of PBR is enough.- **Scatters:** `get_scatters` lists the surfaces (groups and components, with the materials of their faces) and the  components that can be scattered, with their size. `set_scatter` spreads components over a surface, limited to the  faces of `surface_materials`: the beds of a garden group get plants, its border shrubs. The plants to scatter often  stand once in the model or on a hidden tag. Typical densities per m²: grass components 100 to 300, ground cover 5  to 20, shrubs 0.5 to 2, trees 0.01 to 0.05. Mix several plants with weights, vary their scale (0.8 to 1.3), sink  grass and shrubs a little with `offset` (-0.01 to -0.03 m), and start with a low density: many instances slow the  render down. `remove_scatter` removes a scatter and returns its settings, so `set_scatter` can make it again.- **Look:** tone mapping, contrast, white balance, vignette, bloom and glare are post processing, so try them freely.- **Speed:** for quick comparisons lower the samples with `set_render_settings` and put them back afterwards.
## Ideas to offer
- Setting up a model from scratch for a client presentation: plants, materials, sky, lights, camera and look.- Art direction: "make this look like a magazine shot", judged and improved step by step.- The same view at several times of day, each saved as its own image.- Evening lighting: find the lamps and place lights where a lighting designer would.- Material options from a design brief, rendered side by side, then the original materials back.- Troubleshooting: why a render is dark, noisy or flat, and the fix.- Finding the best viewpoints of a model with quick low-sample renders.
What agents can do
Section titled “What agents can do”An agent sees and changes what you see in the render window:
| Look | The scene: camera, environment, materials, lights and settings. The render itself, at the number of samples it asks for. What you selected in SketchUp. What is at any point of the render, with its position in the model. |
| Light | Sky presets and the sun, HDRIs from the Asset Manager, a plain color. Place, move, change and remove point lights, spotlights (with IES profiles), area lights and directional lights. |
| Materials | Change any material like the material editor does, or replace it with one from the Asset Manager. Turn a lawn into real grass with the Grass material, a rug or a throw into real strands with the Fur material. Put a material back as it was before the agent changed it, textures included. |
| Plants | Scatter grass, plants, trees or any other component of the model over the faces of a group, limited to the faces of a material: the lawn, the beds, a hillside. In SketchUp, with Rayscaper 0.9.100 or newer. |
| Camera | Move and aim the camera, the focal length, resolution and depth of field. Whether a section cut lets light in. |
| Look and output | Exposure, tone mapping, white balance, contrast, vignette, bloom and glare. The samples and render method. Save the render as PNG, or EXR with a license. |
| Compare | Keep renders in the render history, show them again, compare them and try another post processing on them. |
| Window | Start, pause and resume the render. When you ask for it, see the whole render window and click in it. |
Examples
Section titled “Examples”These were recorded with the prompts as shown and the Rayscaper skill installed: the first two in SketchUp, the others in the living room of the Quick Start scene, opened in the standalone app. Every run is different: the agent judges the render each time, so you get its own take on your prompt.
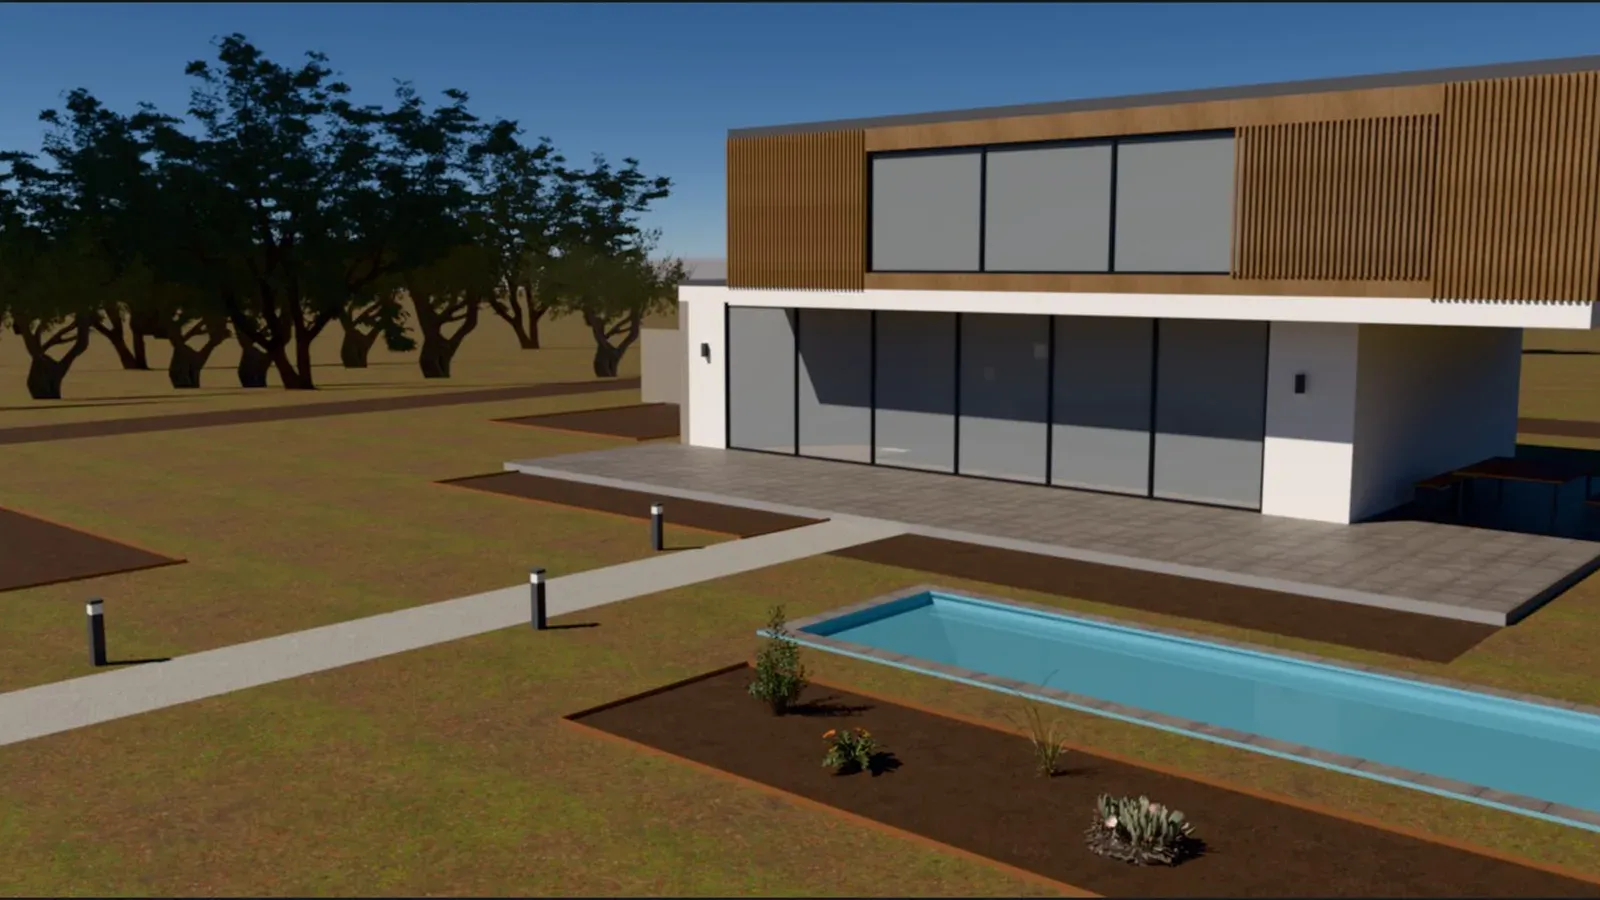
A whole scene, from a bare model
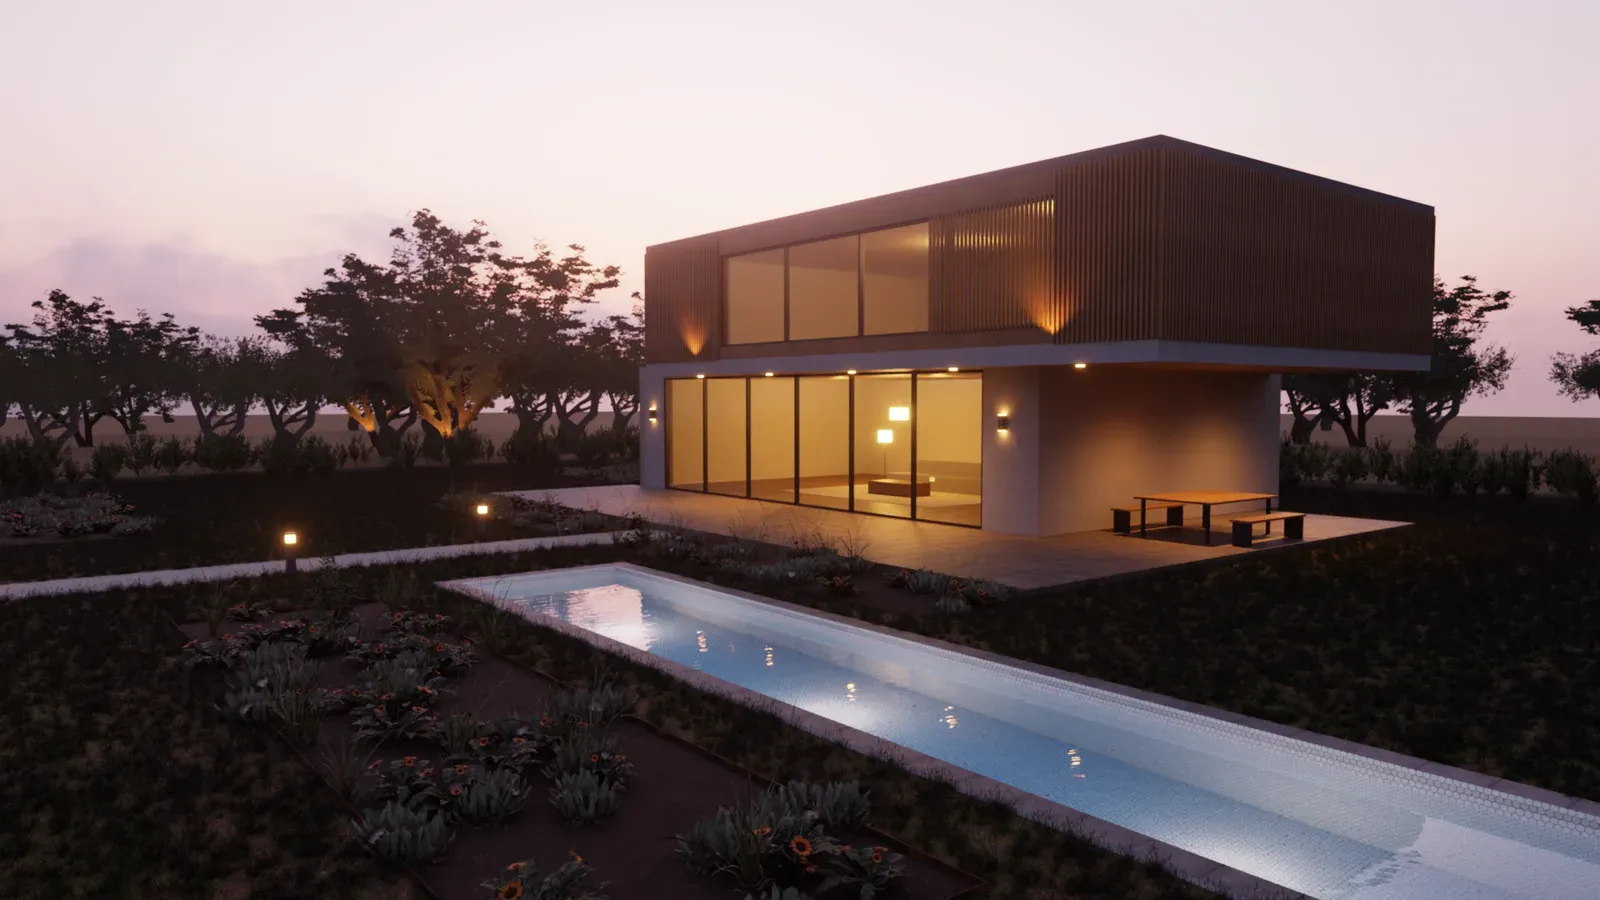
Section titled “A whole scene, from a bare model”“This is my villa design, straight from SketchUp: nothing is set up for rendering yet. Turn it into a dusk shot for a client presentation, the kind that sells the house. Do the whole setup: plant the lawn, the beds and the shrub border with the plants in the model, make the materials look real, set the sky, light the house, the pool and the garden, frame the shot, and finish with the render settings and the post processing. Check the render after each step.”
The model had a few plants, each standing once in a bed, light fixtures without lights, and nothing set up for Rayscaper. Claude found that the sky followed SketchUp’s sun (Use SketchUp Sun for Sky was on). So instead of moving the sun, it chose a dusk HDRI from the Asset Manager. Then it worked through the scene:
- Materials: it made the windows real glass and tinted the pool water turquoise. It made the lamp shades and the lenses of the fixtures glow at 2700 K. It gave the plain surfaces textures from the library: stucco, concrete, corten and a mosaic in the pool.
- Plants: it planted the garden with three scatters, each limited to the faces of one material. Grass on the lawn, gazanias, succulents and grasses in the beds, and shrubs along the border.
- Lights: lights in the rooms so they glow through the glass, lights in the pool, uplights on the oak, IES downlights under the overhangs and uplights in the trees. It dimmed the sky so the lamps stand out. When the pool lights made the water too bright, it turned them down.
- Camera and colors: it moved the camera to eye height at the end of the pool, so the pool leads into the house. It turned the HDRI to put the sunset glow behind the house. It set the colors with the ACES tone mapping, a cooler white balance, bloom and a vignette, and saved a 1920×1080 render at 1024 samples.
An evening in a restaurant
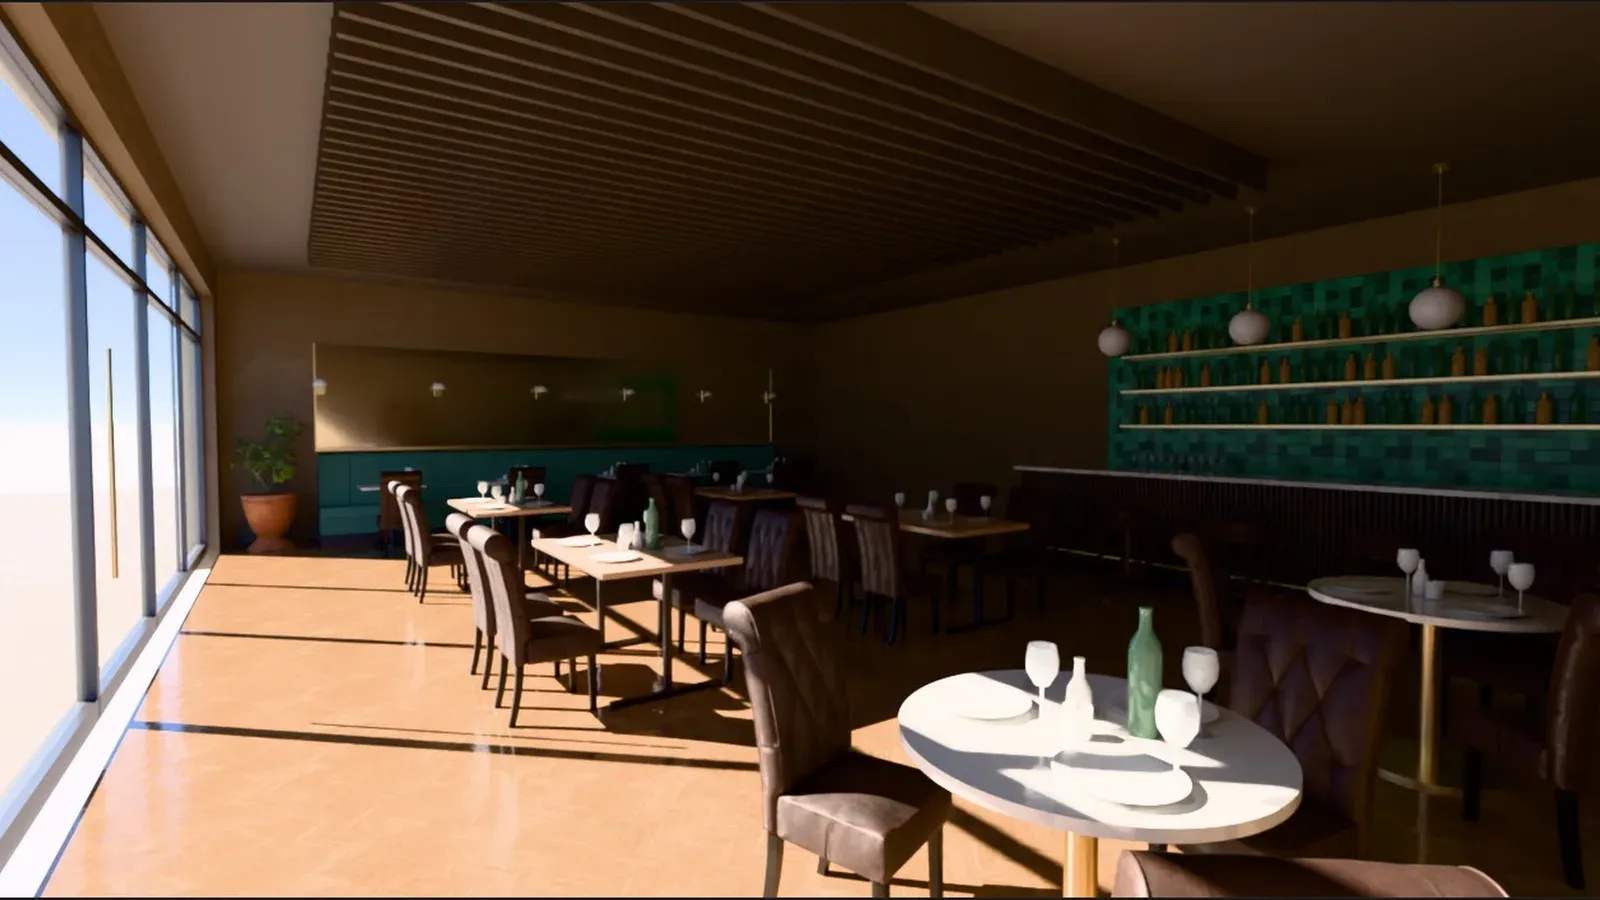
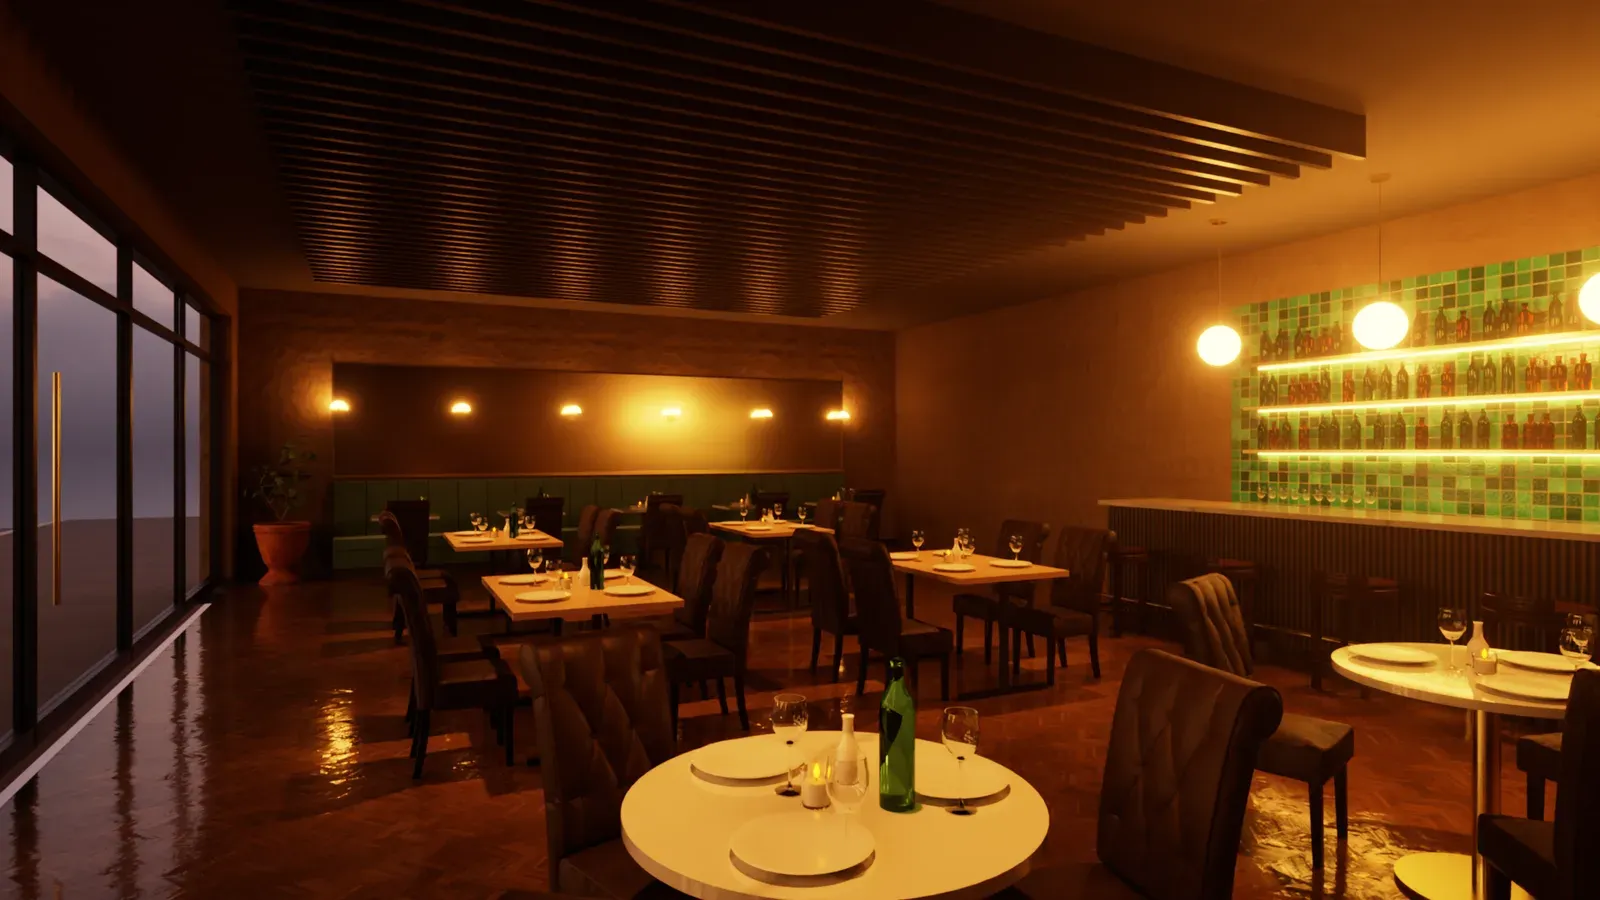
Section titled “An evening in a restaurant”“This is our new restaurant, a modern bistro, modelled in SketchUp: nothing is set up for rendering yet. Make a striking evening render of the dining room for the opening campaign, with the warm, moody atmosphere of a Friday night. Set the sky for dusk, make the materials look real (the glassware, the bottles, the antique mirror, the marble, the brass and the velvet), let the globes, sconces, LED strips and candles glow and add the lights the room needs, frame the shot, and finish with the render settings and the post processing. Check the render after each step.”
Recorded with Claude Code on Opus 5.5 in SketchUp, with narration. It ends with the model as it came out of SketchUp and the render one prompt made of it.
The restaurant was modelled down to the bottles on the shelves, with plain SketchUp materials. Claude chose a dusk HDRI
because the sky followed SketchUp’s sun. It turned the glasses, bottles and windows into real glass and the brass into
metal. It gave the velvet a fabric sheen and the marble a polished coat. It made the opal globes, the sconces, the LED
strips of the back bar, the candles and the windows across the street glow. Then it found the tables with pick_point
and hung an IES spotlight above each one. It framed the room level and wide from the corner, and cooled the white
balance against the warm lamps. It added contrast, bloom and a vignette, raised the bounces for the mirror and the
bottles, and saved a 1920×1080 render at 1024 samples.
Art direction
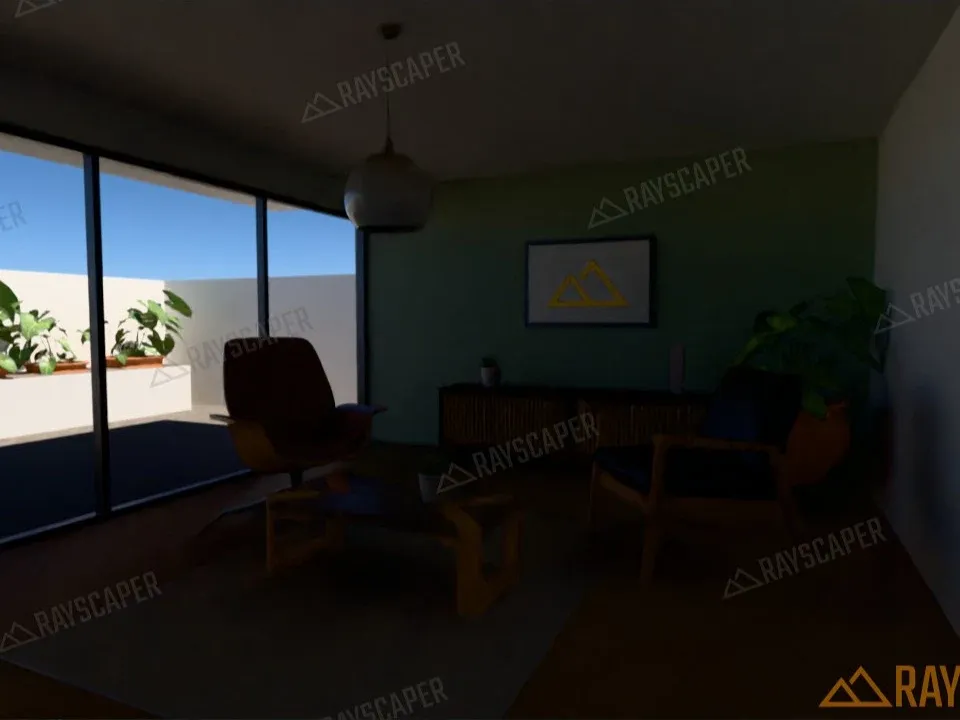
Section titled “Art direction”“Make this render look like a shot from an interior design magazine. Look at the render, decide what holds it back and fix it step by step: the light, the camera and the look. Check the render after each change.”
Claude found three problems:
- The sun stood high in the north, so no sunlight came in.
- The 90° lens stretched the corners, and the tilted camera made the verticals lean.
- The tone mapping was flat.
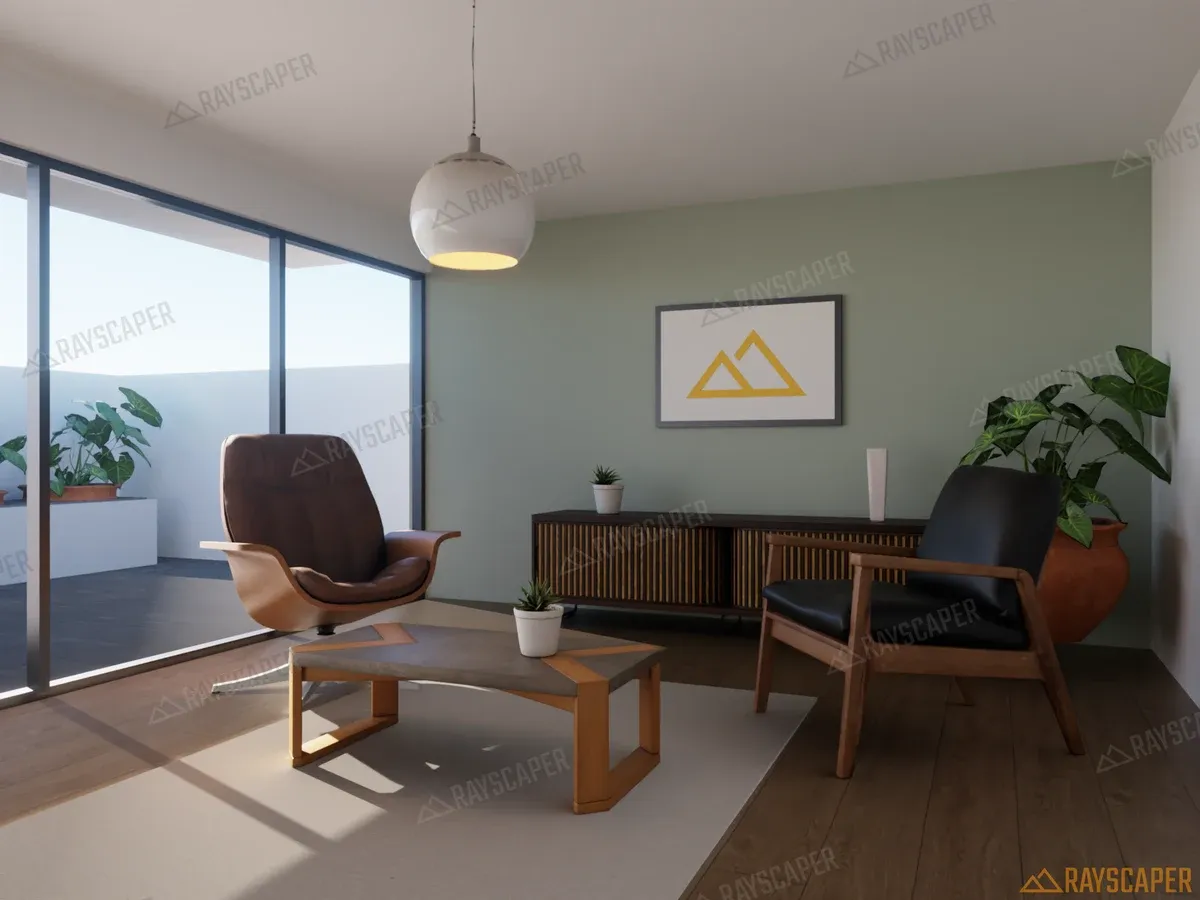
It tried a few sun positions. Then it measured the window, the roof overhang and the garden wall with pick_point. It
worked out that the sun only reaches the rug between about 25° and 36° high, and set the sun there. It moved the
camera back to a level 28 mm view. It added a soft fill light outside the glass, and turned it down to a tenth when the
render showed that the rug became too bright. It lit the pendant and adjusted the colors. It tried depth of field too,
and dropped it because the room looked like a miniature.
One prompt, five renders
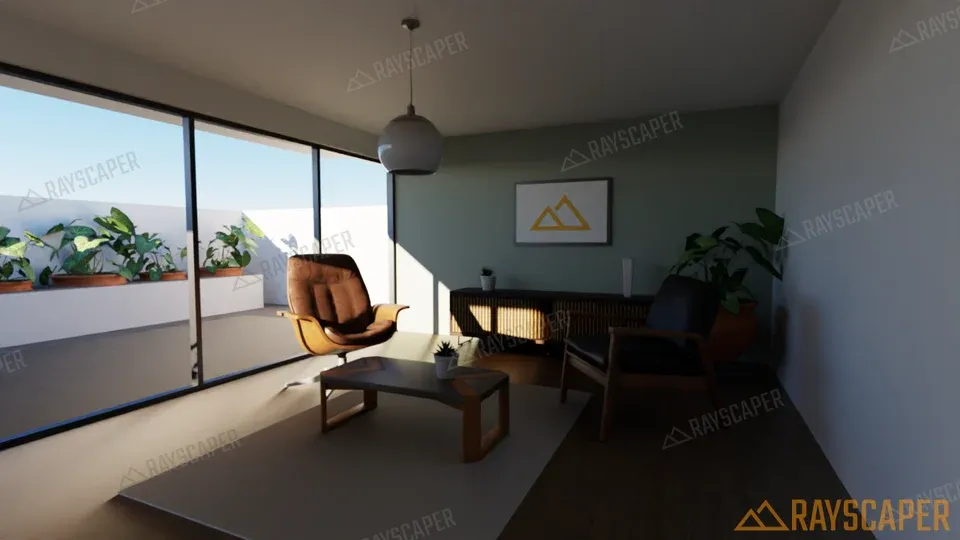
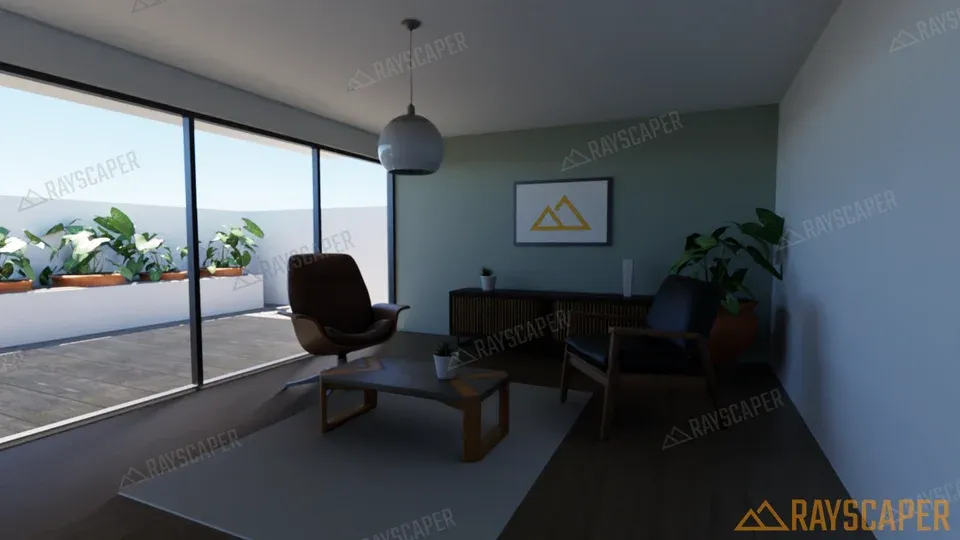
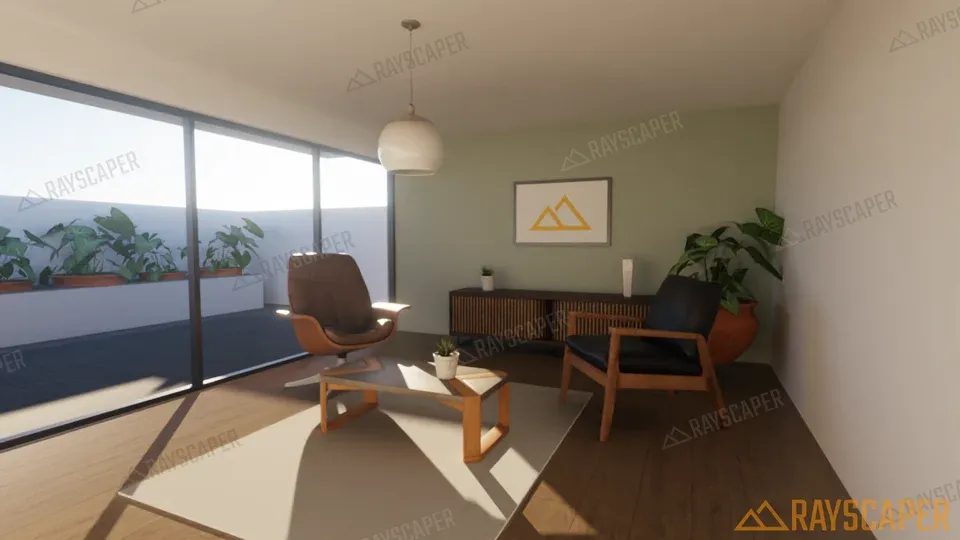
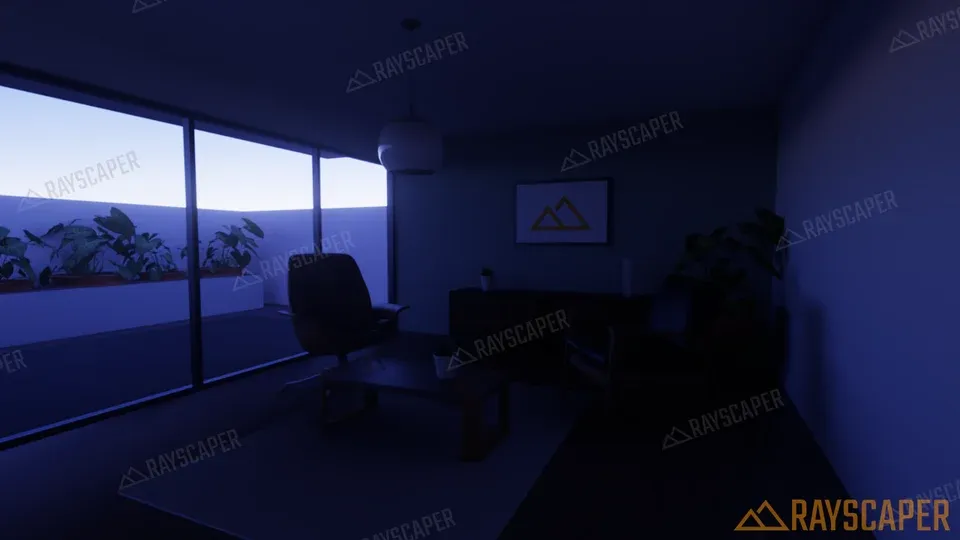
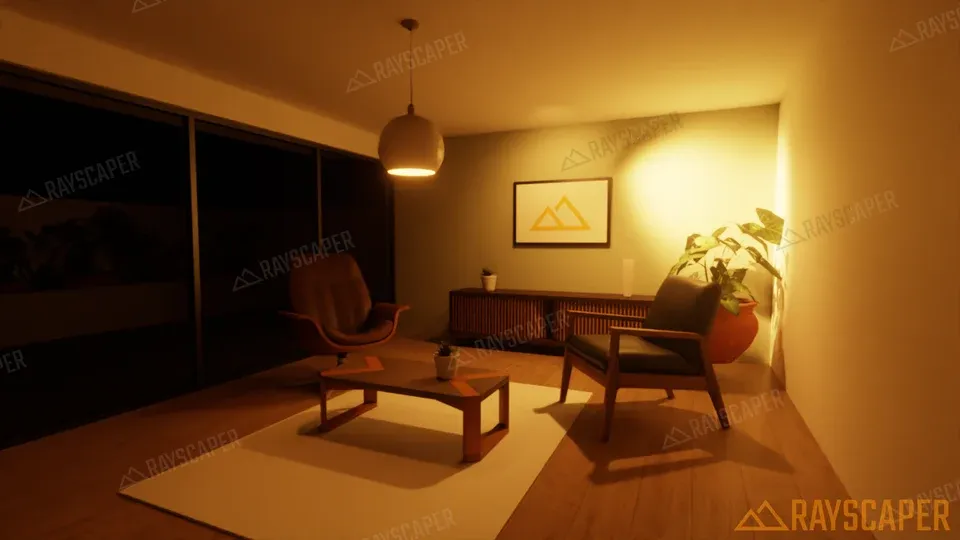
Section titled “One prompt, five renders”“Render this view at five times of day: morning, noon, golden hour, blue hour and night. For the night shot switch on the lights of the room so it feels lived in. Get the exposure right for each one and save them.”
Claude set the sun, the exposure and the white balance for each time of day and checked every render before saving it. It found that the garden wall blocks the sun below about 12°, so its golden hour sun sits at 13.5° to get a beam across the rug. For the night shot it put the sun below the horizon, made the pendant lamp glow at 2700 K, and placed two spotlights with IES profiles: a wall wash on the print and a flood over the plant in the corner. They did nothing at first: the render showed it had placed them inside the ceiling, so it lowered them.
Lighting design
Section titled “Lighting design”“It’s 9 pm and the sun is down. Light this room the way a lighting designer would: warm light from the pendant lamp, a few accents, and no dark corners or harsh hotspots. Look at the render to check your lights and adjust them until it looks good. Save the final render.”
Claude set the sky to blue hour with the sun below the horizon and built a lighting plan:
- the pendant globe, glowing at 2700 K, as the main light,
- IES spotlights on the print and the plant,
- two soft downlights, so no corner goes black,
- lights on the deck and between the plants outside, so the window shows a lit patio instead of a black mirror.
Its first render was much too bright and orange. It cut every light to about a quarter, set the exposure back and cooled the white balance, and checked again before saving. At the end it listed the settings it changed, so they can be put back.
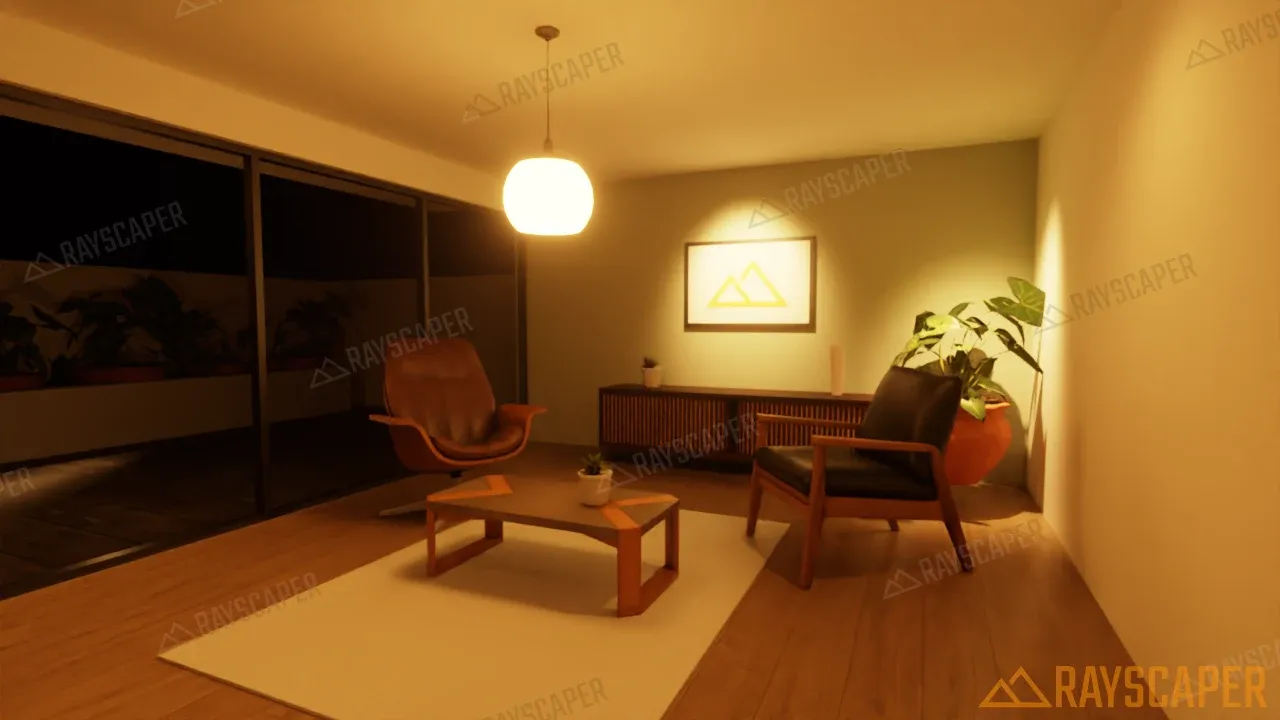
In SketchUp, the lights an agent places become Rayscaper light components in your model, and you can undo them like any other change.
Design options for a client
Section titled “Design options for a client”“My client can’t choose a style for this room. Make three versions: Scandinavian (light oak, white, pale wool), industrial (concrete, black steel, cognac leather) and warm mid-century (walnut, olive, brass). Use materials from the asset library where it has good ones. Save a render of each, then put the original materials back.”
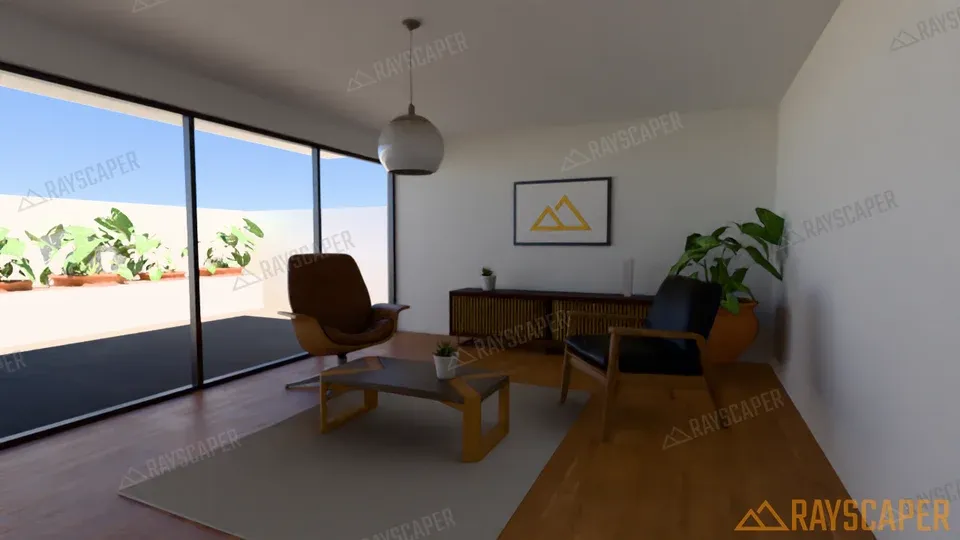
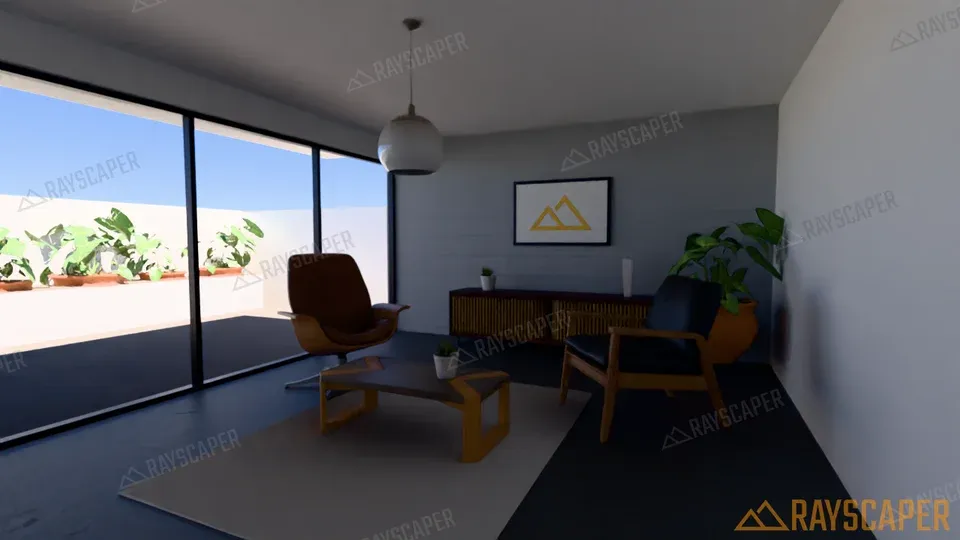
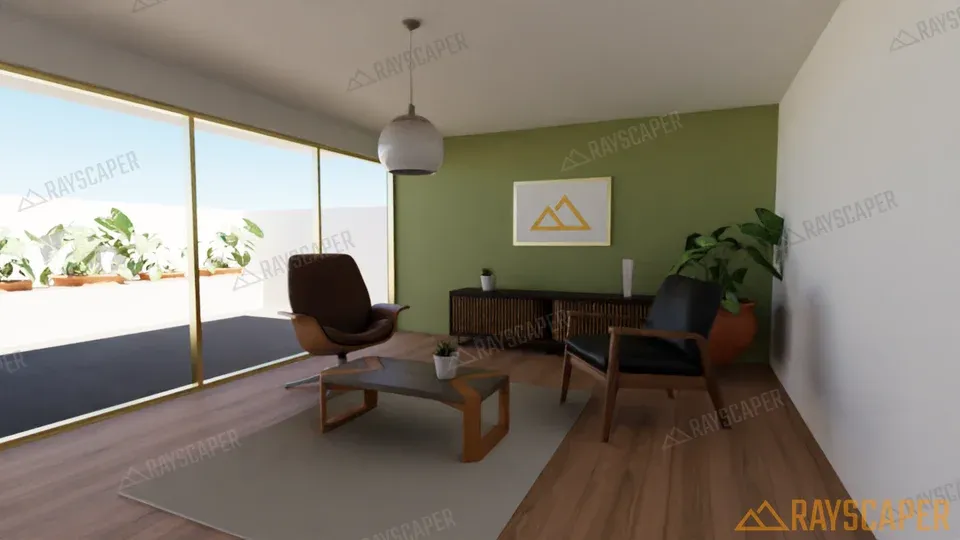
Codex read every material of the room, searched the asset library for oak, wool, concrete, steel, walnut and brass, and changed the floor, the feature wall, the walls and the window frames for each style, with an exposure and white balance to match. It left the furniture alone: its materials use the scene’s own image textures, which the tools can’t bring back once they are replaced. Afterwards it put the original materials back and said which one it couldn’t restore exactly.
Things to try
Section titled “Things to try”- “Make what I selected look like brushed brass.”
- “Plant the hillside with pines and the meadow with wildflowers, and keep the path clear.”
- “My render is dark and noisy. Find out why, fix it and tell me what was wrong.”
- “Find the five best viewpoints of this house with quick renders, and save the best three.”
- “Here’s a photo of a room I like. Match its mood: the light, the colors and the contrast.”
- “The client wants the sofa in their brand color, #1F4E79.”
- “Light the dining table with three pendant spotlights 80 cm above it.”
- “Compare this view with an HDRI of an overcast sky and with a clear sky, and tell me which reads better.”
- “Try three moods for this room, keep each one in the render history and show me the best one.”
- “Save a 4K render of this view for print.”
While an agent works
Section titled “While an agent works”The badge in the top right corner of the render shows what the agent is doing, for example Claude is looking at the render.
- Stop Agent Access: click the badge and then Stop Agent Access. This disconnects every agent and refuses new ones until you click Allow Agent Access in the same place.
- Undo: in SketchUp, lights that an agent places or moves and the camera moves are SketchUp steps, which Edit > Undo takes back. Changes of materials, the environment and post processing are Rayscaper’s own: ask the agent to put them back. It gets the previous settings with every change, and the Rayscaper skill tells it to keep them.
- SketchUp materials stay as they are: the agent changes the Rayscaper side of a material. The Reload button of the material editor brings back the SketchUp values.
Privacy
Section titled “Privacy”Rayscaper’s MCP server runs on your computer and only accepts connections from it, and web pages can’t reach it. Rayscaper doesn’t send your scene anywhere. Your agent app does: what the agent reads, like the renders it looks at and the names and settings in your scene, goes to the AI provider of that app, under its terms. Close the render window or click Stop Agent Access when you don’t want an agent to see your scene.
Troubleshooting
Section titled “Troubleshooting”The agent has no Rayscaper tools. Agent apps load MCP servers when a session starts: start a new session after setting it up, with the render window open.
The tools fail with a connection error. The render window is closed, or you stopped agent access. Open the window or allow access again from the badge. If the agent still can’t connect, start a new session.
Two Rayscapers are running, for example SketchUp’s render window and the standalone app. Only one can use port 47390. The second one takes 47391 and so on, and its Tools > Connect AI Agent… shows that address. The agent talks to the Rayscaper at the address you set up.
The agent can’t move the camera in SketchUp. Lock Camera is on in the Rayscaper toolbar, so the render doesn’t follow SketchUp’s camera. Turn it off.